
Bookings gives you a faster alternative to time-consuming and repetitive scheduling tasks, all while optimizing your organizational resources. Customize appointment details, booking requirements, and specify service providers to streamline the booking experience. Integration with staff’s Office calendar helps to quickly find available time to avoid double-booking, and an easy to navigate webpage lets your students find and book appointments around the clock. Bookings helps you spend less time scheduling and more time meeting with students. (All instructions here have been adapted from Bring in business 24/7 with Microsoft Bookings article by the Office 365 team.)
Bookings provides you a unique web page that your students can use to schedule appointments, even when you’re not around to pick up the phone or respond to an email. The web page is simple to use: the student first selects the service they want and, based on availability you provide, chooses a day and time when you or one of your TAs is available, enters their contact information and books the appointment.
To help students remember to show up, Bookings allows you to set up a reminder email, which is sent based on how much notice you want to give before the appointment.
Sometimes your students need to reschedule or cancel a booking they’ve made. With Bookings, it’s easy for them to make a self-service change. They simply click the link in the confirmation email or the appointment in their calendar, which then takes them back to the scheduling web page where they can pick a different day and time or cancel the appointment.
Manage Bookings
All student bookings are visible in a centralized booking calendar, giving you a complete view of upcoming appointments. You can reschedule, cancel or re-assign an existing booking to an available TA member. You can also quickly create a new booking if you’re talking with a student in-person or on the phone and use the day “split view” to quickly see which of you are available at a given time.
How to Add Bookings
To get started, sign in to Office 365, click All Apps->, open Bookings from the app launcher and then click the Get it now button. You’ll need to provide a bit of information about what types of appointments you want your students to book. After that, just click the Save and publish button in the booking page tab to publish your scheduling web page. Your students will now be able to start booking appointments with you.
Customize Your Booking Site
There is a few things you must customize first. Below are a list of resources to get you started:
Enter Your Department, Office and/or Business Information: Add and edit the contact information, logo, and hours of operation for your Bookings page.
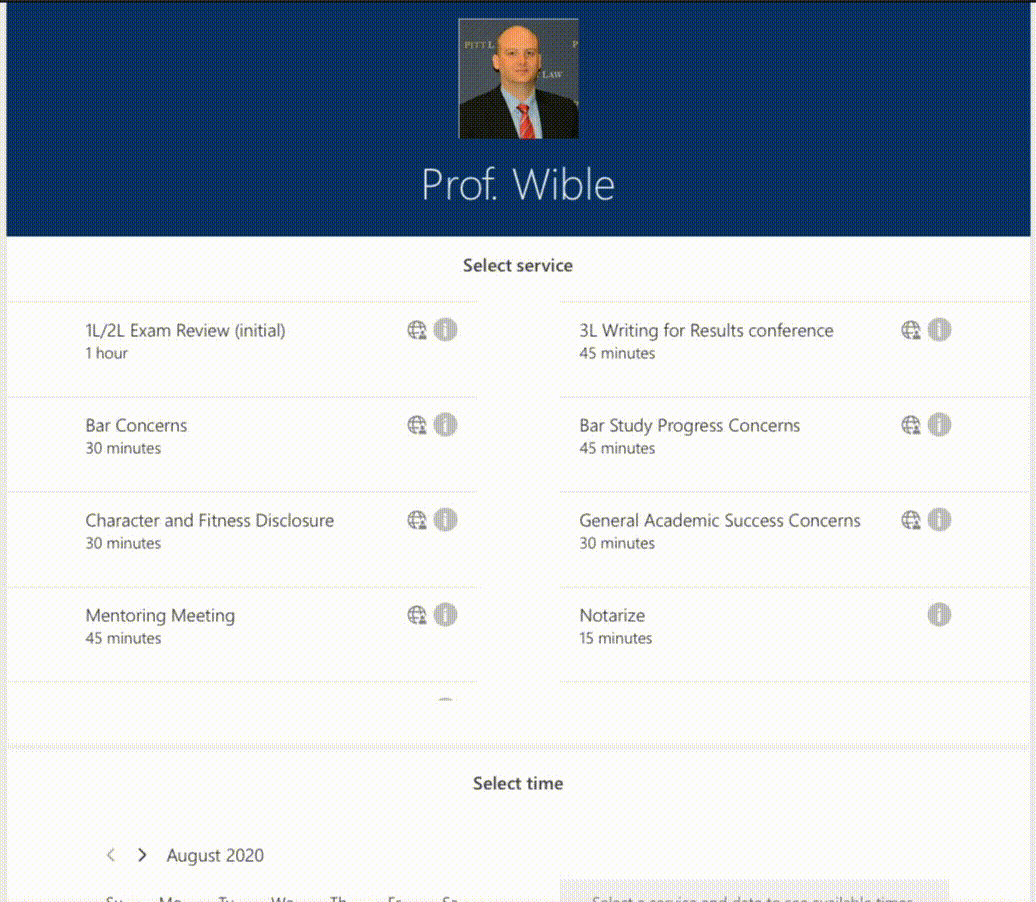
Define Your Service Options: Here you create a service name, description, location (choose whether you want to meet in person or have an online meeting), duration, default reminders to students and/or TAs, internal notes about the service, etc. You can also tag the TAs who are qualified to provide assistance.
Pro Tip #1: In the confirmation e-mails, you can put additional instructions based on the service type. For example, Prof. Wible puts notes like the following:
- Notarize confirmation: "Don't sign anything ahead of time and to remember to bring photo ID!"
- Review Exam confirmation: "Rreview with the faculty member before we meet."
Pro Tip #2: Set certain items to have more reminder notice than others. Example, exam reviews and mentoring get a 24 hour notice while anything else has a 15-minute reminder sent to the student. This helps to almost eliminate missed meetings.
Customize Your Bookings Site: Here you can set options like a theme, logo, and options for how users will interact with your bookings.
LinkedIn Learning Bookings Course: This course covers everything you need to begin booking appointments with ease. Instructor David Rivers begins by walking through how to set up your business offerings and public calendar. David then shows how to create and manage your customer and staff lists, set scheduling policies, and assign staff to open appointment dates and times. He also covers how to manage your bookings from a mobile device.